Tuesday, July 12, 2022

Energy Monitoring


I was warned by the installer that my choice of system size might not perfectly offset my usage. I decided to take that as a challenge to reduce my energy usage instead of increasing the size of my solar system. So far I have had two power bills that reflected a full month of solar usage, with an average of $20 due. To address this I have decided look into more closely metering individual devices to better understand my energy usage. 

I know there are several options that could be used to get this data into home assistant. Luckily someone already did a great job of summarizing these options, XtremeOwnage investigated each of the options here. Based on that article I decided to go with the Emporia Vue 2 flashed with ESPHome as described here

Using the documentation flaviut published was pretty straight forward. The first major issues I ran into was with the initial flashing of ESPHome. This was my first attempt at using ESPHome with my Home Assistant ecosystem. I installed ESPHome as an add on to my install of Home Assistant, but due to compilation issues I was unable to use the add on to flash the device. I ended up using my desktop to flash the device, which allowed me to move forward.  

The hardware installation was very straight forward and only took about 45 minutes. I ended up having to reverse the collar on the antenna since my breaker box is flush with the wall in the garage. Luckily my breaker box was just updated when I had my solar installed, so there was ample room for the device and additional wiring for all 18 CT clamps. One of two issues I had was installing the CT clamps for my solar circuit backwards since they all indicate the proper direction as towards breaker, while the solar circuits should be away from the breaker, luckily that could be resolved in software.

Another issue I had was because I was unlucky in my choice of phase to monitor for my dryer. Apparently the motor for the dryer drum is only 120, not  240. The phase I chose monitor is only used for the heating element so I will either have to be clever in any automation I setup to detect when the dryer is done or I will need to adjust which phase has the clamp. 

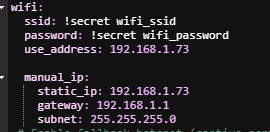
When I tried to update the initial configuration with ESPHome I learned that the yaml file was actually used as a source file when compiling the program for ESPHome so I still couldn't used the Home Assistant add on to update it. I then installed the ESPHome docker image on my unraid system. One additional change I had to make for the docker install of ESPHome to recognize the Vue was set a static IP on the device. Once that was specified the device was found I was able to remotely update it. 


For a basic installation the only required changes to the base yaml file needed are specifying which phase each input and their multiplier for tracking 240V devices on a single sensor.  Because I have solar power, I had to add some additional sensors to have the correct info exposed for the home energy dashboard. I needed breakout the total power to separately expose data on when energy was being imported and exported. While the total_daily_energy sensor accurately tracks the net usage, Home Assistant does not play well with power sensors that decrease in KWH or report negative values. The below code adds the needed sensor data to home assistant to properly use the energy dashboard.


Now that I have all this info available in home assistant I can take a deeper look into what devices my power is really going too. My AC unit is taking the majority of my power this week. Being a 10 SEER unit I will have to seriously consider upgrading to a modern more energy efficient unit once I have more funds available. 


Friday, July 8, 2022

Resolving Errors

 For the past several months I have been dealing with issues updated Home Assistant OS. Anytime I tried to upgrade from 7.2 my HUSBZB-1 stick stopped showing up as an option for the zwave and zigbee integrations. Other users reported similar issues with version 7.3 so I waited for 7.4. Once 7.4 was confirmed by other users to correct the issue I tried to upgrade. 

 When I initially upgraded to 7.4 the issue persisted so I though the other uses might have been mistaken about it being resolved. I worked through downgrading the OS to 7.2 and waited for a future update to resolve it. Then I forgot all about the issue until upgrading a few weeks later. In my haste to install  a core update I also updated the OS. This lead to my post about disaster recovery

This week I finally circled back to this issue since Home Assistant somehow seemed to start automatically running the update over and over again forcing the system to OS 7.6. This completly crippled my smart home. This lead me to searching the old threads on forums where other users had similar issues with OS 7.3  and thinking I needed to upgrade my HUSBZB-1 stick to the latest firmware as recommended here. I was ultimately successful in updating the firmware, but my issues persisted. 

At this point I was left thinking either I needed to start from scratch  or a new zwave/zigbee stick. I decided to start checking all reasonable solutions before paying for some new hardware, so I flashed another small SSD I had in my spare parts bin with the latest image for installing Home Assistant OS 8.0. At this point I chose to initialize the new instance of Home Assistant and try to configure the stick with a single zwave outlet and a single zigbee switch  to confirm if starting from scratch was a possible solution. 

This attempt failed also; the stick was still not showing up as expected. Additionally the fresh install was not reporting the expected 8.0 OS version, it was still reporting 7.6.  This lead me to look at the Raspberry Pi hardware as that was one of two constants in all these issues. I realized I still had the micro-sd card inserted, which had the PI image that is supposed to be used to switch the PI to booting for USB instead of micro-sd. I am still not sure how this was causing the issue, but after removing the micro-sd card and switching back to my original SSD the updates completed successfully to 7.6 with the stick working. This allowed me to finally get completely up to date. 

Wednesday, July 6, 2022

Open EVSE

 After over three and half years making due with a level 1 charger for my car I have decided to upgrade to a proper level 2 charger. I chose to install an Open EVSE charger as it allows local control and can integrate with Home Assistant nicely by way of  a HACS integration. 


This charger allows me to see detect when the vehicle was plugged in and issue a command to turn off the charging before the car has communicated that a charging session needs to start.  Additionally it allows Home Assistant to send commands to set the max charge amperage. This data allows me to setup automations to automatically recharge quickly after allowing the battery time to cool if I have come back from lunch or  to schedule slow charging overnight. 

This charger also exposes the energy usage data. While my old solution of the factory level 1 charger with a smart outlet also exposed this data, it is important to note that functionality was not lost in this upgrade. I would hate to take two steps forward just to take one step back when upgrading smart home equipment. 

While my car is only a plug-in hybrid that tops out at about 14 AMPs, the charger was installed with wiring, outlet, and breaker rated for 60 AMPs. This will allow the Open EVSE to be used for several years and remain useful if I upgrade to a full EV in the future. Additionally this installation added a much needed 240v outlet in my garage that can be used for other things such as powering a welder or providing power for a trailer if the need ever arises.

Sunday, July 3, 2022

MQTT

Some of the device I have integrated into my smart home use MQTT to communicate to Home Assistant. Since MQTT is a widely used protocol, utilities exist for most existing systems.  While I still don't understand completely the underlying protocol of MQTT, it seemed like the best route to setup a custom sensor to get feedback from a script on my Linux system for ripping backups of discs. 

I simply had to mosquitto_pub entries to the the existing shell script that automates the process in order to know the status of process.  Since I only really care to know when I need to get up to swap a fresh disc into the system I simply report 1 when the tray is open and 0 when the ripping is in progress.


On the Home Assistant side it was simple to add a binary sensor to subscribe to the topic and messages I specified in the shell script. This allowed me add an automation to flash my WLED bias lighting on my desk with a specific color scheme for a minute to let me know it has completed.


Additionally I decided to try something new by using this to add tracking data for this process in Home Assistant. To track the number of discs ripped I added  a counter helper to store the data.  The automation that I created for the notification light was adjusted to call the counter increment function to track the number of discs I have ripped. I will be manually setting the current count to reflect discs that were ripped before this was integrated. 


While I normally like to link back to the appropriate project when talking about projects, I have chosen not to do so here due to legal implications of specifying the content of the discs being ripped. I will simply say the software doing the ripping is widely considered the go to solution and is free but not open source. The script for automating the ripping is separate but also easily findable. 

Update:
After clearing the backlog of discs I had sitting around I realized that I could also make use of this MQTT data to intelligently save power when I am not actively ripping discs. I have configured the automated script to run as a service on startup (which required a small re-write of the ripping automation script to avoid using paths based on executing user) and configured the BIOS to power on when power is restored. With those settings and by adding a smart plug I was able to create an automation so that if the tray is open for 1 hour the power is cut. Then when I want to resume ripping discs I just have to turn the smart plug back on with either a voice command, through Home Assistant, or by directly hitting the physical button. 

Server Monitoring

I have a headless Linux server that I have previously written about for ripping media disks.  While I have had MQTT integrated into the bash...